“Mastering the AR15 Lower Receiver: Troubleshooting Made Easy”

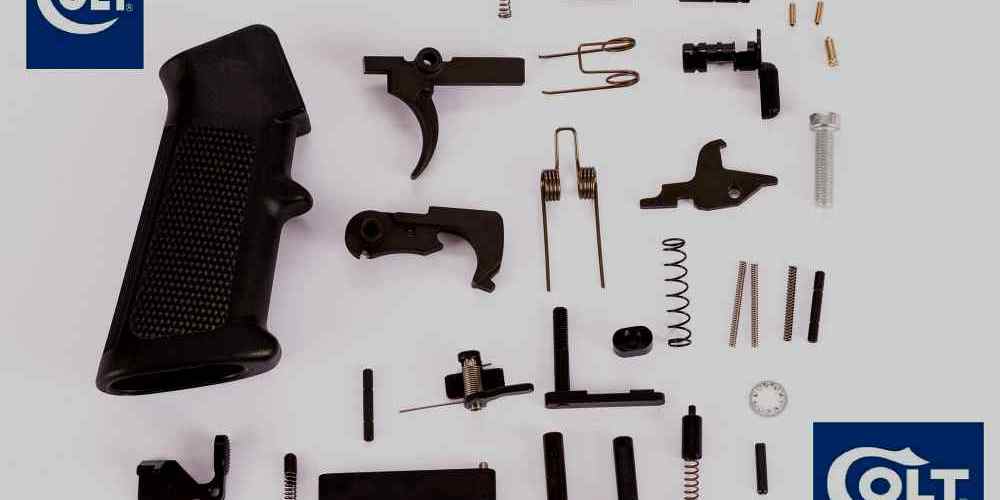
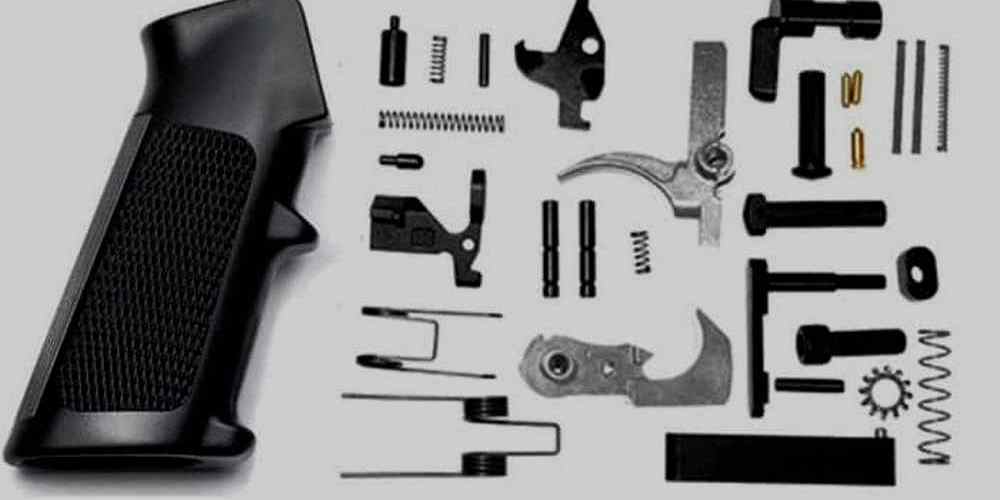
Proper Installation of Lower Parts Kit
When it comes to building or customizing your AR15, one of the most important components to get right is the lower receiver. This is the part of the rifle that houses the trigger group, magazine well, and buffer tube, among other things. Proper installation of the lower parts kit is crucial to ensure that your AR15 functions correctly and safely.

One common issue that many AR15 owners run into is having difficulty installing the lower parts kit. This can be frustrating, but with a little patience and attention to detail, you can easily troubleshoot and resolve any issues you may encounter.
First and foremost, it’s important to make sure that you have all the necessary tools and parts before you begin the installation process. This includes a hammer, punch set, needle-nose pliers, and of course, the lower parts kit itself. It’s also a good idea to have a clean, well-lit workspace to prevent any small parts from getting lost.
Once you have everything you need, start by carefully following the manufacturer’s instructions for installing the lower parts kit. This will typically involve inserting the trigger, hammer, safety selector, and other components into the lower receiver in a specific order. Take your time and double-check each step to ensure that everything is properly aligned and seated.

If you find that a particular part is not fitting correctly or is difficult to install, don’t force it. This can lead to damage to the lower receiver or the part itself. Instead, try gently tapping the part into place with a hammer and punch, or using needle-nose pliers to adjust the position as needed.
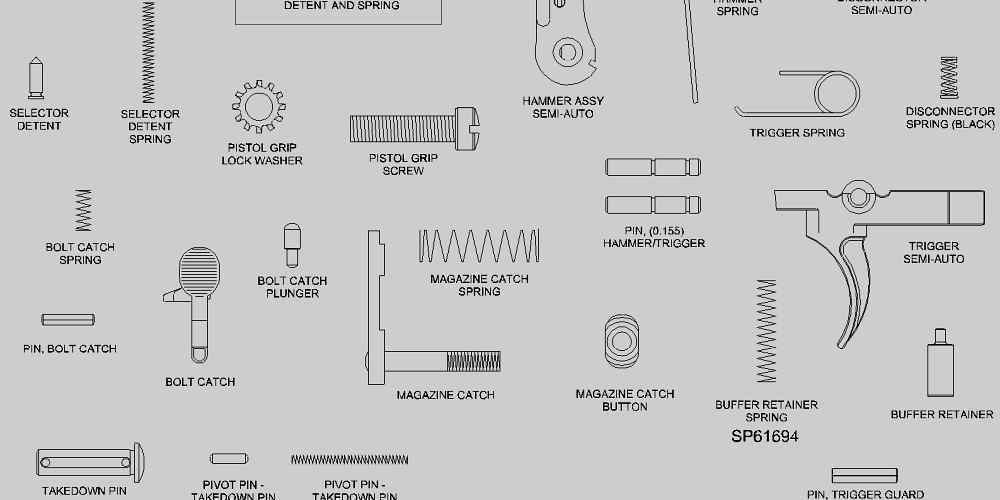
Another common issue that can arise during the installation of a lower parts kit is having difficulty with the detents and springs. These small components can be tricky to work with, but with a steady hand and some patience, you can easily overcome any challenges.
When installing detents and springs, be sure to use caution and work slowly to prevent them from flying across the room. A small piece of tape over the detent hole can help keep these tiny parts in place while you work. Additionally, using a magnetic parts tray can help prevent any accidental loss of detents or springs.
If you find that a detent or spring is not staying in place, try using a small amount of grease or oil to help hold it in position. This can make it easier to install the part without it slipping out of place.
Overall, proper installation of the lower parts kit is essential for the functionality and reliability of your AR15. By following the manufacturer’s instructions, using the right tools, and taking your time to ensure that each component is properly seated, you can avoid common issues and enjoy a smooth and trouble-free shooting experience.
Remember, if you encounter any difficulties during the installation process, don’t hesitate to reach out to a professional gunsmith for assistance. They have the knowledge and experience to help troubleshoot any issues and ensure that your AR15 is in proper working order. With a little patience and attention to detail, you can successfully install a lower parts kit and enjoy your custom-built AR15 for years to come.
Troubleshooting Trigger Malfunctions
The AR15 is a popular rifle platform known for its versatility and customization options. However, like any mechanical device, it can experience issues from time to time. One common area where shooters may encounter problems is with the lower receiver, specifically with the trigger mechanism. In this article, we will discuss some common trigger malfunctions that AR15 owners may encounter and how to troubleshoot them.
One of the most common trigger issues that shooters may face is a gritty or rough trigger pull. This can be caused by a variety of factors, including dirt, debris, or lack of lubrication. To address this issue, the first step is to thoroughly clean the trigger mechanism. Remove the lower receiver from the rifle and disassemble the trigger group. Use a solvent and a brush to clean all the components, paying special attention to the trigger and sear surfaces. Once clean, apply a light coat of lubricant to ensure smooth operation.
Another common trigger issue is a heavy or inconsistent trigger pull. This can be caused by a variety of factors, including worn or damaged trigger components, improper installation, or an out-of-spec trigger group. To troubleshoot this issue, first check for any visible signs of wear or damage on the trigger components. If any parts appear worn or damaged, they should be replaced. Additionally, ensure that the trigger group is properly installed and that all components are in their correct positions.
If the trigger pull is still heavy or inconsistent after checking for wear and proper installation, it may be necessary to adjust the trigger pull weight. Many aftermarket trigger kits are available that allow shooters to customize their trigger pull weight to their preference. These kits typically include a new trigger, hammer, and disconnector, as well as springs and other components to adjust the trigger pull weight. Follow the manufacturer’s instructions for installation and adjustment to achieve the desired trigger pull weight.
Another common trigger issue that shooters may encounter is a trigger that fails to reset after firing. This can be caused by a variety of factors, including worn or damaged trigger components, improper installation, or an out-of-spec trigger group. To troubleshoot this issue, first check for any visible signs of wear or damage on the trigger components. If any parts appear worn or damaged, they should be replaced. Additionally, ensure that the trigger group is properly installed and that all components are in their correct positions.
If the trigger still fails to reset after checking for wear and proper installation, it may be necessary to adjust the trigger reset. Some triggers have adjustable reset screws that allow shooters to customize the reset distance to their preference. Follow the manufacturer’s instructions for adjusting the reset screw to ensure proper function.
In conclusion, troubleshooting trigger malfunctions on an AR15 lower receiver can be a straightforward process with the right knowledge and tools. By following these tips and techniques, shooters can address common trigger issues and ensure their rifle is functioning properly. Remember to always follow proper safety procedures when working on firearms and consult a professional gunsmith if you are unsure about any aspect of troubleshooting your AR15 lower receiver.
Addressing Magazine Fitment Problems
If you’re a proud owner of an AR15 rifle, you know how important it is to have a properly functioning lower receiver. The lower receiver is the heart of your rifle, where all the important components come together to ensure smooth operation. However, like any mechanical device, issues can arise that may affect the performance of your AR15. One common problem that many AR15 owners face is magazine fitment issues.
Magazine fitment problems can be frustrating, but they are usually easy to diagnose and fix. The first step in troubleshooting magazine fitment issues is to ensure that you are using the correct type of magazine for your AR15. AR15 rifles typically use either a standard mil-spec magazine or a polymer magazine. If you are using the wrong type of magazine, it may not fit properly in your lower receiver, causing feeding issues.
Once you have confirmed that you are using the correct type of magazine, the next step is to check for any obstructions or debris in the magazine well of your lower receiver. Sometimes dirt, debris, or even excess lubricant can build up in the magazine well, preventing the magazine from seating properly. Take a close look inside the magazine well and clean out any foreign objects that may be causing the issue.
If you have checked the type of magazine and cleaned out the magazine well, but are still experiencing fitment issues, the problem may lie with the magazine catch. The magazine catch is the small button located on the side of the lower receiver that holds the magazine in place. If the magazine catch is worn or damaged, it may not engage properly with the magazine, causing it to wobble or fall out during use.
To check the magazine catch, remove the magazine from your AR15 and inspect the catch for any signs of wear or damage. If the magazine catch appears to be in good condition, try adjusting the tension by tightening or loosening the screw that holds it in place. Sometimes a simple adjustment can make a big difference in how the magazine fits in your lower receiver.
If you have tried all of these troubleshooting steps and are still experiencing magazine fitment issues, it may be time to consider replacing the magazine catch altogether. A new magazine catch is relatively inexpensive and easy to install, and can often solve fitment problems that are not resolved by cleaning or adjusting the existing catch.
In conclusion, magazine fitment issues are a common problem that many AR15 owners face, but they are usually easy to diagnose and fix. By checking the type of magazine you are using, cleaning out the magazine well, inspecting the magazine catch, and adjusting the tension or replacing the catch if necessary, you can ensure that your AR15 lower receiver is functioning properly and feeding reliably. Don’t let magazine fitment problems get in the way of enjoying your rifle – take the time to troubleshoot and address any issues that may arise.
Fixing Buffer Tube Assembly Issues
If you’re experiencing issues with your AR15 lower receiver, one common area to troubleshoot is the buffer tube assembly. This component plays a crucial role in the functioning of your rifle, so it’s important to ensure that it is properly installed and functioning correctly.
One common issue that AR15 owners may encounter with the buffer tube assembly is a loose or wobbly buffer tube. This can cause the buffer and buffer spring to rattle around inside the buffer tube, leading to inconsistent cycling and potential malfunctions. To fix this issue, you’ll need to tighten the buffer tube to the lower receiver.
Start by removing the buffer and buffer spring from the buffer tube. Then, use a castle nut wrench to tighten the castle nut on the buffer tube. Make sure to apply enough torque to secure the buffer tube in place, but be careful not to over-tighten it, as this can cause damage to the threads on the buffer tube or lower receiver.
Once the castle nut is tightened, reinstall the buffer and buffer spring, and check for any remaining wobble in the buffer tube. If the issue persists, you may need to replace the buffer tube or castle nut with new components to ensure a secure fit.
Another common issue with buffer tube assemblies is a misaligned or improperly installed buffer retainer. The buffer retainer is a small pin that holds the buffer in place when the rifle is disassembled. If this pin is not properly aligned or installed, it can cause the buffer to become stuck or prevent the rifle from cycling properly.
To fix this issue, start by removing the buffer and buffer spring from the buffer tube. Then, use a punch or small screwdriver to push the buffer retainer pin back into place. Make sure that the pin is aligned correctly and fully seated in its groove on the buffer tube.
Once the buffer retainer is properly installed, reinstall the buffer and buffer spring, and cycle the rifle to ensure that the buffer moves freely and the buffer retainer functions as intended. If the issue persists, you may need to replace the buffer retainer with a new one to ensure proper functioning of the buffer tube assembly.
In some cases, AR15 owners may encounter issues with the buffer tube itself, such as cracks or damage to the threads. If you notice any signs of wear or damage on the buffer tube, it’s important to replace it with a new one to prevent potential malfunctions or safety hazards.
When replacing the buffer tube, make sure to use a high-quality component that is compatible with your AR15 lower receiver. Follow the manufacturer’s instructions for installation, and ensure that the buffer tube is securely tightened to the lower receiver to prevent any issues with cycling or functioning.
By troubleshooting common issues with AR15 lower receiver buffer tube assemblies, you can ensure that your rifle functions reliably and safely. If you’re unsure how to address a specific issue or if you encounter any difficulties during the troubleshooting process, don’t hesitate to seek assistance from a qualified gunsmith or firearms expert. With proper maintenance and attention to detail, you can keep your AR15 in top condition for years to come.
Resolving Bolt Catch Problems
If you’re experiencing issues with your AR15 lower receiver, one common problem you may encounter is with the bolt catch. The bolt catch is a crucial component of the AR15 that is responsible for holding the bolt open after the last round is fired. This allows the shooter to easily reload the rifle without having to manually pull back the bolt. However, if the bolt catch is not functioning properly, it can cause a variety of issues that can affect the performance of your rifle.
One of the most common issues with the bolt catch is that it fails to hold the bolt open after the last round is fired. This can be frustrating for shooters, as it can make it difficult to quickly and efficiently reload the rifle. If you are experiencing this issue, there are a few troubleshooting steps you can take to try and resolve the problem.
First, check to make sure that the bolt catch is properly installed and functioning correctly. Sometimes, the bolt catch can become loose or misaligned, which can prevent it from properly engaging with the bolt. If this is the case, you may need to tighten the bolt catch or adjust its position to ensure that it is properly aligned with the bolt.
If the bolt catch is properly installed and aligned, the issue may be with the magazine you are using. Some magazines may not properly engage with the bolt catch, which can prevent it from holding the bolt open after the last round is fired. Try using a different magazine to see if the issue persists. If the problem is resolved with a different magazine, you may need to replace the magazine that was causing the issue.
Another common issue with the bolt catch is that it can become worn or damaged over time, which can prevent it from properly engaging with the bolt. If you suspect that the bolt catch is worn or damaged, you may need to replace it with a new one. Fortunately, bolt catches are relatively inexpensive and easy to replace, so this should not be a difficult or costly fix.
In some cases, the issue with the bolt catch may be related to the buffer spring or buffer tube. If the buffer spring is worn or damaged, it may not provide enough tension to properly engage the bolt catch. Similarly, if the buffer tube is damaged or out of spec, it may prevent the bolt catch from properly engaging with the bolt. In these cases, you may need to replace the buffer spring or buffer tube to resolve the issue.
Overall, troubleshooting issues with the bolt catch on your AR15 lower receiver can be frustrating, but with some patience and persistence, you should be able to identify and resolve the problem. By checking the alignment and installation of the bolt catch, trying different magazines, and inspecting the buffer spring and buffer tube, you should be able to get your AR15 back up and running smoothly in no time. If you continue to experience issues with the bolt catch, it may be a good idea to consult with a professional gunsmith for further assistance.